

I was tired of trying to squeeze exactly what I wanted onto my original 40 GB Apple TV. While the streaming worked ok, it was not perfect. I really wanted my entire library on the apple TV in the living room. I had been eyeing an upgrade, but held off until Apple TV take 2 came out. Once that was out, I gave it a couple of weeks, but finally gave in, picked up a 2.5″ EIDE drive for about $115 from OWC, and started the process.
I started followed the steps as outlined at this old engadget post, though this does not seem to work fully anymore, and I had to modify the steps near the end to get it to work.
http://img.engadget.com/2007/03/23/how-to-upgrade-the-drive-in-your-apple-tv/
The hardest part may have been the 1st step of peeling off the rubber bottom. I probably was not patient enough, and should have started with a putty knife. I ended up with a few small tears, but nothing disasterous. Since my unit is in a cabinet anyway, it doesn’t really matter… In fact, if the bottom does tear, putting on a four rubber feet may give it better airflow/cooling anyway. For now, I just put the sleeve back on with the tears.
I then had issues with my USB <-> IDE adapter… The power connection I have it is only for 3.5″ drives, and I couldn’t get enough juice with just the USB. My neighbor had a macally phr-250cc usb/firewire 2.5″ drive encolusre that he let me borrow, and that did the trick. Plenty of power on firewire. (I have since picked up a couple of the phr-250cc’s as they are pretty nice…)
Once that worked I made an image of the original Apple TV drive… From the terminal use diskutil list to find out which disk to use, and then the following command to make an image:
dd if=/dev/disk2 of=/Users/Sean/AppleTV.img bs=1024k (mine was disk3, and I actually did this on a different volume)
There is no progress indicator, but you can go in to the finder and do a get info on it, or use another terminal window and issue a killall -INFO <pid> and that will show you how many bytes have copied.
Once that is done, you disconnect the original Apple TV drive and connect your new drive. The engadget article says you can just do the following, which is copying the 1st part of the drive rather than the whole drive, to save time, but I tried this several times and had issues further in the process…
dd if=/Users/Sean/AppleTV.img count=1335 of=/dev/disk2 bs=1024k
So I finally gave up with that and found a comment later in the thread that just copied the whole drive as follows:
dd if=/Users/Sean/AppleTV.img of=/dev/disk3 bs=1024k
When that is complete, issue this:
diskutil list
diskutil eject disk3
And then:
gpt recover disk3
diskutil eject disk3
Then remove the old Media Partition based on what you see in diskutil list:
gpt remove -i 4 disk3
diskutil eject disk3
Then find the new start:
gpt show disk3
diskutil eject disk3
Then create the new partition, using the info from the last step.
gpt add -b 2732072 -i 4 -t hfs /dev/disk3 <== this number will vray based on your drive size
diskutil eject disk3
Engadget then has your format the partiion, but that did not work for me. Either the format would fail, or if it did work, the following steps would fail — either booting the Apple TV or trying to do a restore on it.
Instead, disconnect the HD, install it in the Apple TV, and power it up. When it has booted,do a Reset Settins and then Factory Restore. It will fill the media partition from the original size to all the space that is left on its own. One interesting thing is that it comes back on s/w version 1, but it upgrades to 2 with no problem.
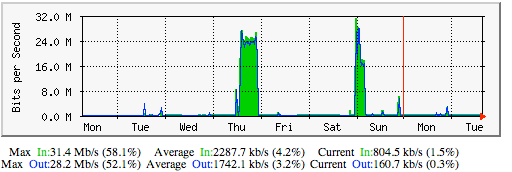
I then configured iTunes to sync all 110 GB of my content, which took many hours.. I run mrtg on my base station, so you can se here I got around 25 Mbps via wireless to sync. I had a misconfig in which only 5 of my movies synced the 1st time, so that is what that second spike is…
It has been running fine and it is nice having everything there all the time, with another 120GB or so free to grow into. 🙂

Hi Sean
Did you have to name the drive “Media” or did the Factory Restore took care of this? If you did named the drive, how did you do it?
Thanks
Sylvain
You know it has been so long, that I don’t know for sure… But I am pretty confident that I did NOT have to do that… I followed the engadget link fairly closely, with only the modifications mentioned in the post.
Fantastic, just tried your method and it worked. Thanks for all your valuable information.
Sylvain
This process is the best. Grew my ATV to 320GB, no issues. The recoever process took the HDD to it max size and then I was able to do the upgrade.